Hi, welcome to the SEKO OmniParcel FAQ.
On this page:
| Table of Contents | ||||||||
|---|---|---|---|---|---|---|---|---|
|
...
| Expand | ||
|---|---|---|
| ||
Yes, you can check your tracking report of all your OmniParcel accounts together. Just You just need to make sure all your accounts are grouped together. If you are not getting your account in this groupseeing all your accounts, please contact our helpdesk. |
| Expand | ||
|---|---|---|
| ||
Yes, you can. Please refer to the stock size management pagehttps://helpdesk.omniparcel.com/knowledge-base/stock-size-management/ |
| Expand | ||
|---|---|---|
| ||
Yes, you can. Please check the address book management page for more information : https://helpdesk.omniparcel.com/knowledge-base/address-book-management/ | ||
| Expand | ||
| title | Can I configure the email template of returns consignment. |
| Expand | ||
|---|---|---|
| ||
Yes, you can. Please check Returns Email Template management screen at https://helpdesk.omniparcel.com/knowledge-base/return-email-template/ | ||
| Expand | ||
| ||
Yes, you can. Please check commodities management page for more details. |
| Expand | ||
|---|---|---|
| ||
To stop your parcel at origin scan you need to add block consignment functionality in OmniParcel. To learn more about blocking consignments please visit the block consignment page. |
| Expand | ||
|---|---|---|
| Expand | ||
| ||
| ||
Yes, you can please check custom mapping management page at https://helpdesk.omniparcel.com/knowledge-base/customs-mapping/ |
| Expand | ||
|---|---|---|
| ||
To stop your parcel at origin scan you need to add block consignment functionality in OmniParcel. To know more about block consignment please check at https://helpdesk.omniparcel.com/knowledge-base/block-consignment/ |
| |
It’s not allowed to change the address once the consignment is manifested. If you would like to change the address before the manifest process, then please delete the consignment from reprint and manifest screen or via API and create the a new oneconsignment. If you have already manifested the consignment and the parcel is still in our warehouse then please contact our customer service at customerservice@omnianza.zendesk.com with complete details of your OmniParcel account and parcel. |
...
| Expand | ||
|---|---|---|
| ||
No, you don’t need to whitelist your IP, but in case however if your IP is blocked then , please contact support@omniparcel our helpdesk. com |
| Expand | ||
|---|---|---|
| ||
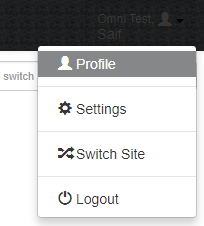
Please go to your profile settings to change the timezone. You can on your login name on top right corner. |
OmniParcel API
| Expand | ||||
|---|---|---|---|---|
| In API integration with OmniParcel please make sure you have used proper tag to ask for tracking events on given email ID, also please make sure you have used that tag outside of individual consignment Item array?
| |||
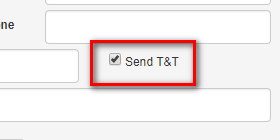
If creating consignments via API, ensure that receiver email is populated and that you are passing SendTrackingEmail as “true”. If you are creating Consignments manually then please make sure you have ticked “Send T & T” option in manual consignment creation screen. |
...
| Expand | ||
|---|---|---|
| ||
Please refer to this section 8.0 Tracking Webhook / CSV / API - read through Yes, please see our tracking options here. |
| Expand | ||
|---|---|---|
| ||
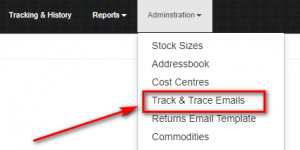
Please check your track and trace email settings in OmniParcel to make sure your default template is not disabled. The settings will be at OmniParcel > Administration > Track and Trace Emails
|
...
| Expand | ||
|---|---|---|
| ||
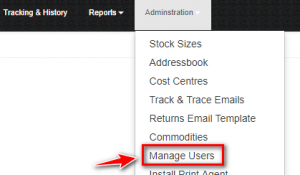
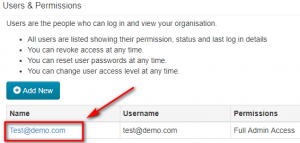
You can get your API key from your OmniParcel account settings, but you must be OmniParcel Site Admin to get this API key. First login with your OmniParcel account details, then follow below instructions. Click on Manage Users from Administration menu.
Click on the User you need API for. You will find your API Key at the bottom of this setting page. But, make sure you would need your different API key for your staging (test) account. If you do need to require staging environment, then please contact your account manager.need API for. You will find your API Key at the bottom of this setting page. |
OmniParcel Tracking
| Expand | ||
|---|---|---|
| ||
http://track.omniparcel.com is the tracking URL for all consignments created by OmniParcel |
| Expand | ||
|---|---|---|
| ||
You can have your personal branded tracking URL like http://track.mysitename.com. To setup your branded tracking URL please follow the settings from branded URL setting page https://helpdesk.omniparcel.com/knowledge-base/setup-branded-domain-name/have a look at our tracking portal campaign and branded tracking portal pages. |
| Expand | ||
|---|---|---|
| ||
Yes, you can. Please click below to see the setting for ad track banners management. |
| Expand | ||
|---|---|---|
| ||
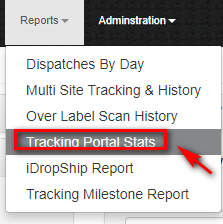
You can check the total clicks on Ad track banners by going in OmniParcel> Reports > Tracking Portal Stats?
|
| Expand | ||
|---|---|---|
| ||
Please check the settings for tracking email customization at here. |
| Expand | ||
|---|---|---|
| ||
Yes, you can track your parcel by order number if you have provided your order number in reff1/ Delivery reference the DeliveryReference field at the time of consignment creation. |
| Expand | ||
|---|---|---|
| ||
To register for the tracking event update you need to subscribe on to email alert alerta for tracking events. Email alert tracking subscription textbox will only appear on tracking portal if the settings for that alert textbox is enabled. To enable the tracking alert box, user need to go to track and trace Email settings, Menu> Administrator > Track & Trace Emails Select your track and trace email setup or create new if you don’t have one. Then change show subscriber = Yes. |
| Expand | ||
|---|---|---|
| ||
Yes, you can integrate your live chat application widget code in track and trace email setting. To add your live chat code, user need to go to track and trace Email settings, Menu> Administrator > Track & Trace Emails Select your track and trace email setup or create new setup if you don’t have one. You can find chat script Code text box to paste your code at the bottom of setting page. |
OmniParcel Consignment Creation
...
| Expand | ||
|---|---|---|
| ||
There are many reasons behind that.
| ||
| Expand | ||
| ||
There are many reasons behind that.
|
| Expand | ||
|---|---|---|
| ||
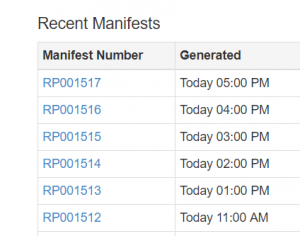
Yes, You can download the recent list of manifest from Reprint and manifest screen. You can find your manifest on right side of the screen. User cannot download the manifest for Omni Dynamic inbound consignments. |
...
| Expand | ||
|---|---|---|
| ||
| Expand | ||
| ||
There would be few reasons behind that, Make sure you have used the correct email address without any spelling mistakes and make sure you have checked your spam folders as well. If you still have any issue, please contact Support@omniparcel.com with all details of your transactions. |
| Expand | ||
|---|---|---|
| ||
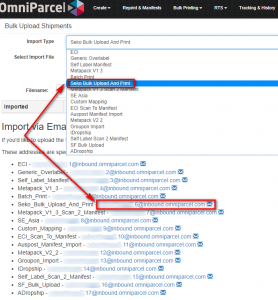
Email address will be unique by different account and by different file type. If there is no special requirement then your default upload file template will be Seko Bulk Upload and Print. To get to know more about your template please contact your account manager. You can find your email id from below steps. Navigate to OmniParcel Menu > Bulk Printing > Bulk Upload Beta Your email address would be based on your upload file type. See below image for more details. Please note: Every customer and every new OmniParcel account will have unique email ID. |
| Expand | ||
|---|---|---|
| ||
Yes, you can use your own consignment range, please contact your account manager to know more in details. |
| Expand | ||
|---|---|---|
| ||
Yes, you can use your own carrier account in OmniParcel, please contact your account manager to know more in details. |
| Expand | ||
|---|---|---|
| ||
No, you cannot delete the consignment once it’s been manifested. |
Return to the top
OmniParcel Printing
| Expand | ||
|---|---|---|
| ||
The Print Agent is the utility that runs on your PC, in the background managing all the print jobs. To know more about Print Agent click here. https://helpdesk.omniparcel.com/knowledge-base/install-print-agent/ |
| Expand | ||
|---|---|---|
| ||
OmniParcel can generate 4” X 6”, 4” X 7” and A4. |
| Expand | ||
|---|---|---|
| ||
To know more about Print Agent click here. https://helpdesk.omniparcel.com/knowledge-base/install-print-agent/ |
| Expand | ||
|---|---|---|
| ||
You must use your own OmniParcel account to login in Omni Print Agent. |
You can check your printer’s queue in OmniParcel Menu > Administration > Printers & Queuebe few reasons behind that, Make sure you have used the correct email address without any spelling mistakes and make sure you have checked your spam folders as well. If you still have any issue, please contact Support@omniparcel.com with all details of your transactions. |
| Expand | ||
|---|---|---|
| ||
Email address will be unique by different account and by different file type. If there is no special requirement then your default upload file template will be Seko Bulk Upload and Print. To get to know more about your template please contact your account manager. You can find your email id from below steps. Navigate to OmniParcel Menu > Bulk Printing > Bulk Upload Beta Your email address would be based on your upload file type. See below image for more details. Please note: Every customer and every new OmniParcel account will have unique email ID. |
| Expand | ||
|---|---|---|
| ||
Yes, you can use your own consignment range, please contact your account manager to know more in details. |
| Expand | ||
|---|---|---|
| ||
Yes, you can use your own carrier account in OmniParcel, please contact your account manager to know more in details. |
| Expand | ||
|---|---|---|
| ||
No, you cannot delete the consignment once it’s been manifested. |
OmniParcel Printing
| Expand | ||
|---|---|---|
| ||
The Print Agent is the utility that runs on your PC, in the background managing all the print jobs. To know more about Print Agent click here: /wiki/spaces/OPKB/pages/2257617001 |
| Expand | ||
|---|---|---|
| ||
OmniParcel can generate 4” X 6”, 4” X 7” and A4. |
| Expand | ||||
|---|---|---|---|---|
| You can go to OmniParcel Menu >Administration> Preference and Settings > Label Printer
| |||
To know more about Print Agent click here: /wiki/spaces/OPKB/pages/2257617001 |
| Expand | ||||
|---|---|---|---|---|
| To know more about Microsoft framework requirement please click here. https://helpdesk.omniparcel.com/knowledge-base/install-print-agent/
| |||
You must use your own OmniParcel account to login in Omni Print Agent. |
| Expand | ||||
|---|---|---|---|---|
|
| |||
You can check your printer’s queue in OmniParcel Menu > Administration > Printers & Queue |
| Expand | ||||
|---|---|---|---|---|
|
| |||
You can go to OmniParcel Menu >Administration> Preference and Settings > Label Printer |
| Expand | ||
|---|---|---|
| ||
To know more about Microsoft framework requirement please click here: /wiki/spaces/OPKB/pages/2257617001 |
| Expand | ||
|---|---|---|
| ||
This issue could happen if printing quality is not good. Please trouble shoot your printer to print sharp prints. |
| Expand | ||
|---|---|---|
| ||
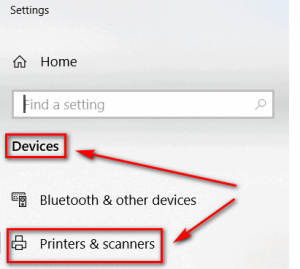
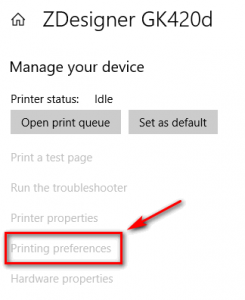
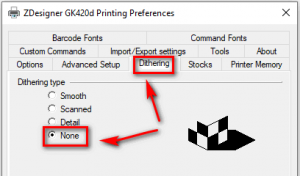
If you experience labels being blurry or grainy when printed on a Zebra printer using the OmniParcel Print Agent, please follow the steps below to resolve the problem. The problem is usually caused by an option called “Dithering type” not having been set to “None”. To change this, open up the Windows settings go to the “Devices”, then select “Printers & scanners” in the menu on the left. Select the Zebra printer and click on “Manage”. Click on “Printing preferences”. Now select the tab “Dithering”, select the option “None” under “Dithering type”, click on “Apply” and then click “OK”. |
| Expand | ||
|---|---|---|
| ||
All our labels are well tested on Zebra GK420D Direct Thermal Printer with default settings. |
Return to the top
RTS
| Expand | ||
|---|---|---|
| ||
| ||
There are few things which you need to check first;
|
| Expand | ||
|---|---|---|
| ||
This issue might happen due to stuck print jobs.
|
| Expand | ||
|---|---|---|
| ||
This issue could happen if printing quality is not good. Please trouble shoot your printer to print sharp prints. |
| Expand | ||
|---|---|---|
| ||
If you experience labels being blurry or grainy when printed on a Zebra printer using the OmniParcel Print Agent, please follow the steps below to resolve the problem. The problem is usually caused by an option called “Dithering type” not having been set to “None”. To change this, open up the Windows settings go to the “Devices”, then select “Printers & scanners” in the menu on the left. Select the Zebra printer and click on “Manage”. Click on “Printing preferences”. Now select the tab “Dithering”, select the option “None” under “Dithering type”, click on “Apply” and then click “OK”. |
| Expand | ||
|---|---|---|
| ||
All our labels are tested on Zebra GK420D Direct Thermal Printer with default settings. |
